So I have been doing nothing to forward my progress (or lack thereof) on my Yoko cosplay, except for staring at the eBay search results for "Yoko Wig" on and off for what's probably a total of 3 hours. I really cannot choose one, I've heard equal amounts of good and bad reviews about all of the sellers that I'm considering buying from. Basically, I have to decide if it's worth the risk on the cheapest one, wasting less money if I don't like it, or if paying more increases the chances of me liking the wig. I'm also looking into which sellers offer returns and such. Oh, if only the girl selling hers on Cosplay.com would respond to my messages and upload an accurate photo!
So that's where I'm at. I still need to do everything else that I talked about in my last post. Oh, well, I looked at bra pads at JoAnn's and decided that I would get one that fits me and make the bikini to fit over it. I'm sacrificing the accuracy of underboob (and some side-boob) for the comfort of support, cleavage, and coverage. People obsessed with accuracy (including a tiny bit of myself) might hate me for it, but I'm thinking it's a fair trade. I can't convince myself that underboob is a good look anyway, even if it is cannon.
New Cosplay Plans & Material Research (Days 514 - 525)
 So! A little while back, I was asked to join a Tengan Toppa Gurren Lagann cosplay group for Kin-Yoobi Con's cosplay contest, and even though I can't compete (because I staff and emcee the contest), I decided to join the group, agreeing that, even if I couldn't wear it, I would finish the cosplay by Kin-Yoobi. In the past, I have been asked to cosplay Yoko, but I never had a real reason too, having never seen Gurren Lagann and not even having a group, so now that I was with a group, I decided to cosplay her. Originally, I had planned to cosplay her first, most recognizable outfit, because, well, it was the most recognizable, but after doing a little more research, I decided to cosplay what I have come to know as "Bounty Hunter Yoko" (shown above). I chose this outfit because it looks extremely similar to her original outfit, but is more covered-up, so that hopefully I won't run into issues with convention staff. If I do run into issues with staff, I have a backup plan (in Ep. 5, she wears a robe that completely covers her body, and I find it amusing).
I began researching materials and reference pictures as soon as I had chosen an outfit, as well as started actually watching TTGL. I haven't watched a new anime in a long time (since Panty & Stocking with Garterbelt finished), and of course I find myself completely in love with the series. Now, I'm not sure if this was because I was already slated to cosplay her, but I also find myself completely in love with Yoko. The moment she sat on Kamina's head for saying she had a big butt, I knew I loved her. I might not love her so much if I wasn't going to already cosplayer her, but I'd like to think that things just worked out really well in that regard, and that I would have loved her and cosplayed her anyway.
My first worry about the costume was the materials. With a ridiculously wide variety of materials to choose from, I've seen Yoko cosplayers use everything imaginable, and sometimes, http://www.blogger.com/img/blank.gifwell, it just doesn't work out. The bikini top is an easy one, bikini fabric. I was fortunate enough to find that JoAnn's sells dance/swim knit fabric. Originally, I was going to buy a bikini top and alter it, but you'd be surprised how hard it is to find a plain, black bikini in the right style. I was also surprised to see how easy it seems to be to make your own bikini. The tutorials on YouTube seem so simple, however, they all forget to put any kind of padding in, and a majority of them, they use t-shirts as material.
Wet t-shirt contest anyone?
In the defense of the video creators, their intent may have been to make bikinis for tanning/showing-off purposes only, but I have yet to come across a video that either says this or puts pads in. Regardless of that, though, most of the tutorials that I have seen are very good and easy to follow.
The next material issue that I had to tackle was the flames on the bikini. Originally, I thought I'd use bikini fabric and hand-sew it on, but then I didn't like the thought of all those stitches and the edges of the fabric showing, so I started researching more about applique materials and techniques. I frequently use Heat 'n' Bond for adding details, mostly ribbon detailing on projects such as Franziska, but the http://www.blogger.com/img/blank.gifkind I use gets very stiff when it's dry, so I wanted to see if there were more options. I was browsing the "bonding & stabilizers" category of JoAnn.com, when I came across iron-on vinyl, which led me to do a Google search which took me here then led me on a fantastical journey of knowledge.
Eventually, I ended up on Specialty-Graphics.com reading about Siser EasyWeed Stretch Vinyl, a thin, soft transfer material commonly used on sports uniforms. It can be applied to "Cotton, Polyester, Poly/Cotton Blends, Spandex, and Lycra", and seems generally easy to work with. At the moment, this is looking like my best option, but it just sounds too good to be true. Also, according to JoAnn.com, the dance/swim fabric isn't supposed to be ironed. So I'm eyeballing this, but also looking for other possibilities.
Another important part of the costume, for me at least, it the shorts. I intend to cosplay several versions of Yoko, and it seems like a lot of them use the same shorts, so I want them to look good. I've never been impressed with any Yoko shorts that I've ever seen. Granted, I have not seen many Yoko shorts, so maybe I just have to look harder. I've seen Yoko's shorts made out of vinyl or pleather, and I can see exactly why cosplayers would choose that material based on the artwork, but I just flat-out do not want to work with or wear pleather or vinyl. Ideally, I'd like leather shorts, but not only are they hard to find and expensive, I'm actually generally opposed to leather, and I'm not sure how ready I am to push my morals on this.
 On an outing to JoAnn's, I browsed the fabric looking mainly for what fabric to use, not eliminating any possibilities until I had fully checked them out. Even though I know how taboo is is for cosplayers to use it, I was drawn toward the satin, and even though I knew I didn't want to use it, I will admit to looking at it. Located right next to it was a satin blend, which caught my attention and is shown left. I know it's hard to tell, but the top half of the image is the "right/correct" side of the fabric, and the bottom part of the picture is the "wrong" side of the fabric. Believe it or not, heh, the "wrong" side of the fabric is less shiny, but that picture was taken under JoAnn's bright fluorescent lights (no flash). At the moment, this is the fabric this is the fabric I'm considering. However, since I keep feeling like I have to defend it (it's not that shiny, it's bad lighting, it's darker in person), I'm still looking for something better. So we'll see.
I'm not even going to get into the jacket and boots right now, since I'm completely lost as to what material to make the jacket out of (I'm not even 100% sure what color it is), and the boots are seriously a whole post on their own. I have some vague ideas for the boots, but nothing concrete, so I'll just hold off on posting about them until I get more ideas.
Galvantula (Days 504 - 513)

 So I quicly (in less than a week) made a Galvantula cosplay. It was intended to be worn to the BAC gathering at the SF Zoo today (June 11th), but unfortunately, after staying up until 5am last night finishing the costume, I got sick this morning and couldn't go. So when I felt better later in the day, my boyfriend came over and took some pictures for me.
The picture to the right was my jumping-off point. I had been trying to decide whether to cosplay Galvantula or Joltik, since Joltik is my favorite Pokemon ever. I finally decided on Galvantula mainly because the design is more fun to work with (more colors and such).
The main thing that I used from the reference picture was the hair, it represents the extra eyes and the mandibles. Unfortunately, I didn't have access to yellow fur, so I ended up using fleece. Now I'm pretty much out of yellow fleece.
 I already owned both shirts that I used, the yellow one is one I bought for Pikachu some time ago. I also already owned the wig, which was also originally for Pikachu. I bought the shorts from Target, I've been wanting yellow shorts for Pikachu anyway.
I made the blue hair pins by covering buttons and sewing them onto bobby pins. The hair wraps are honestly just scrap fabric left over from the rest of the blue pieces that I made. I made the suspenders, they were really simple, I bought the clips for them at JoAnns, they're actually intended to be one piece that you clip onto the back of your shirt to make it fit better (tighter), but I cut the elastic strip connecting them in half and sewed it onto the front of each suspender. On the back, I made a buttonhole (I hate buttonholes with a passion) that fit the buttons on the back pockets.
The arm warmers and leg warmers are fleece, the arm warmers are two pieces of fleece back-to-back, but that just made them kind of awkward (the first one I made was really bad), so for the leg warmers, they're only one piece. All of them have two pieces of elastic each, one near the bottom (wrists/ankles) and one near the top (calves/elbows) to hold them on and help them keep the shape of my arm.
 The blue parts on the bottom of the shorts (supposed to look like Galvantula's tail) are separate from the shorts (so that I can re-use the shorts for Pikachu), they're held on with elastic (though one of them is a little loose for some reason). They're a pain in the butt to try and keep up, so I need to either make them tighter or figure something else out for them.
This was my first time ever making boot covers. Originally, I wanted to make them pointy, but then I changed my mind, and they came out pointy anyway. The good news is that I know why, so next time that I make boot covers, I'll know what to do. The combination of the boot covers and the leg warmers reminds me of Skull Kid from Legend of Zelda.
I would prefer to have blue tights, but the only ones that I own are blue on the front and black on the back, and it makes it nearly impossible to see the blue bits at the bottom of the shorts. Yellow tights would be cool too, but the ones I own now have holes in them. So I'll need to get new ones before the next time that I cosplay Pikachu, which, you know, sucks, because it's so hard to find yellow tights. Maybe I'll just order some from somewhere.
TUTORIAL: Button Covers
This is my first tutorial, so go easy on me. I'm not even sure how much of a need there is for a button cover tutorial, but I thought I'd give it a shot since I was making them and they're fairly easy. I know my camera is horrible, so it's a good thing that the pictures are fairly simple anyway, because they're all blurry.
Materials
• Button
• Fabric
• Scissors
• Needle & Thread
Instructions
Step 1  Begin by cutting a piece of fabric in the shape of the button and about twice the size. In this case, we're using a circular button.
Step 2  (Sorry this picture is blurry.) Set the button aside and begin sewing around the edge of the fabric. Thread your needle in whatever fashion you like, just be sure that it's knotted at the end. Personally, I measure thread from my face to the end of my arm, thread it, and tie the ends together. This is usually enough thread for most hand-stitching projects, and having the thread doubled over makes it stronger.
Start from the inside (the "wrong" side of the fabric that you do not want showing), and keep your stitches close to the edge. Make sure your stitches aren't too close together, or this won't work. Generally, they can be about a pinky finger's width apart, but with varying sizes of fingers and buttons, it may just take some practice and guessing.
Step 3  To make this go by quicker, you don't need to pull the needle all the way through after every stitch, you can let the fabric bunch up at the base of the needle.
Step 4  When you get about one-third to half-way around the circle, or when there's too much fabric bunched up on the needle to make any more stitches, pull the needle through so that the knot in the end of the thread is against the fabric.
NOTE: If you wait too long to do this, you will not be able to pull the thread all the way through, it will get stuck on the fabric. It may take some practice to learn when to pull the thread through, it also depends on the thickness of the fabric and the strength of your thread.
Step 5  Once you stitch all the way around, you can begin to tighten the edges and put the button inside. I like to end my stitches going outward (toward the "right" side of the fabric that you want showing).
Tug on the needle to make the fabric into a pocket (make sure it's right-side out!) and set the button inside. You'll want the button to be face-down.
Step 6  Pull the string completely tight. The fabric should close over the button. Don't pull too hard, or the thread can break, and the fabric can rip. Just pull until you get resistance and the fabric is closed over the button.
Step 7  Not for the somewhat tedious part. (I think I lost my photo for it too.) You're going to stitch back and forth over the bunched-up fabric to both make it stay together and flatten it out some. I usually stitch up through one "lump" of fabric, then across the button and down through another lump. Then it's just back and forth until it's mostly flattened and closed.
Finished!  And that's it! You can then sew your button on to whatever you like, using whatever method that you wish. These particular buttons were used for hairpins. They were attached by just sewing horizontally through the bottom of the button and around the bobby pin.

Materials
• Button
• Fabric
• Scissors
• Needle & Thread
Instructions
 Begin by cutting a piece of fabric in the shape of the button and about twice the size. In this case, we're using a circular button.
 (Sorry this picture is blurry.) Set the button aside and begin sewing around the edge of the fabric. Thread your needle in whatever fashion you like, just be sure that it's knotted at the end. Personally, I measure thread from my face to the end of my arm, thread it, and tie the ends together. This is usually enough thread for most hand-stitching projects, and having the thread doubled over makes it stronger.
Start from the inside (the "wrong" side of the fabric that you do not want showing), and keep your stitches close to the edge. Make sure your stitches aren't too close together, or this won't work. Generally, they can be about a pinky finger's width apart, but with varying sizes of fingers and buttons, it may just take some practice and guessing.
 To make this go by quicker, you don't need to pull the needle all the way through after every stitch, you can let the fabric bunch up at the base of the needle.
 When you get about one-third to half-way around the circle, or when there's too much fabric bunched up on the needle to make any more stitches, pull the needle through so that the knot in the end of the thread is against the fabric.
NOTE: If you wait too long to do this, you will not be able to pull the thread all the way through, it will get stuck on the fabric. It may take some practice to learn when to pull the thread through, it also depends on the thickness of the fabric and the strength of your thread.
 Once you stitch all the way around, you can begin to tighten the edges and put the button inside. I like to end my stitches going outward (toward the "right" side of the fabric that you want showing).
Tug on the needle to make the fabric into a pocket (make sure it's right-side out!) and set the button inside. You'll want the button to be face-down.
 Pull the string completely tight. The fabric should close over the button. Don't pull too hard, or the thread can break, and the fabric can rip. Just pull until you get resistance and the fabric is closed over the button.
 Not for the somewhat tedious part. (I think I lost my photo for it too.) You're going to stitch back and forth over the bunched-up fabric to both make it stay together and flatten it out some. I usually stitch up through one "lump" of fabric, then across the button and down through another lump. Then it's just back and forth until it's mostly flattened and closed.
 And that's it! You can then sew your button on to whatever you like, using whatever method that you wish. These particular buttons were used for hairpins. They were attached by just sewing horizontally through the bottom of the button and around the bobby pin.
Fanime 2011 Cosplay Report (Days 587 - 603)
I survived Fanime Con 2011! (Read my full review here.) My lack of updates is due primarily to trying to finish costumes in a panic. Unfortunately, I didn't finish everything on time, but it's didn't greatly impact the weekend.
(Photo by Steven)
 Koffing was finished on Day 0 of Fanime, most of the waiting was because my mom said she'd make part of it and then said that I didn't remind her in time, or something to that effect, so she finished it the day-of. Made it in time though. I ended up not getting a hammer for Koffing and opted for a grenade instead, both because a grenade was surprisingly easier to find, and I didn't feel like explaining the hammer to everyone who didn't understand it. My Koffing cosplay is ridiculously comfortable. It's so comfortable that I don't even care that I was only recognized about 10 times the whole weekend while my boyfriend was swarmed by photographers, because I was so comfy and he had to wear a wig and hop/shuffle around all day as Magikarp.
Magikarp was about 99% finished, I only didn't make the side fins/ears, which is probably why more than half of the people that saw him thought that he was a red Gyrados. Whoops. I'll make them before the next time that he wears it, though who knows when that will be. Also, the tail got really dirty from, well, just being on the ground. Luckily, the fabric we used was intended for outdoor furniture, so I should be able to scrub out the dirt and red tanbark gunk that got on it.
Fun fact, my sewing machine broke Wednesday night when I was finishing Magikarp, and I blame that for not finishing the ears. Luckily, my boyfriend's mom let me borrow hers to finish what I could.
 (Photo by Branden Kong) Pac-Man and Clyde were already finished, though I need to re-iron the letters on the back of the Pac-Man shirt, probably because my boyfriend always carries the Con Backpack, so the letters got worn off more than the Clyde ones on my shirt. I meant to do that before the convention, but never got to it, unfortunately.
Franziska von Karma still needs some major work, I need to completely remake the cravat (necktie thing), including the gem on it because it just doesn't work, and I always have to hot-glue it together while I'm wearing it or it just doesn't stay up right. I'd still like to get a color-accurate riding crop, but it's money that I just don't have right now. Speaking of the riding crop, a Fanime staffer (actually two of them) who didn't know what they were doing decided to zip-tie my riding crop to my belt loop, even though the forums (and other staff) say that they don't do that. I got it taken care of thanks to my buddy FoxBerry and her boyfriend. Also, my shoes for Franziska are just getting old. I'm considering taking them to the shoe repair shop in my local mall, but it's probably cheaper to get a new pair. And I sat in chocolate in my white Franziska pants. I washed them, but I haven't looked at them since, so I don't even know if it all came out.
 I didn't have a cosplay for the Black & White Ball this year, I just had a tradition Chinese dress, and I put on the Magikarp wig because my hair was bleh. I'm actually considering gettng my hair cut like the wig now though, I think it looked cute! I found out that the dress (which I bought at a second-hand shop) is actually home-made, based on a lot of the stitching, and did come apart in one place, which is why it was in the second-hand shop. A dart that should go all the way to the bottom only goes to the waist. It's not horribly noticeable, but I would like to fix it before the next time I wear it (whenever that is).
Overall, Fanime was fun, I was only stopped for photos a ton as Clyde with Pac-Man, so it was a really relaxing weekend, and my only really uncomfortable costume was Franziska, which I only wore for a day.
Creepy Dress Form (Days 580 - 586)
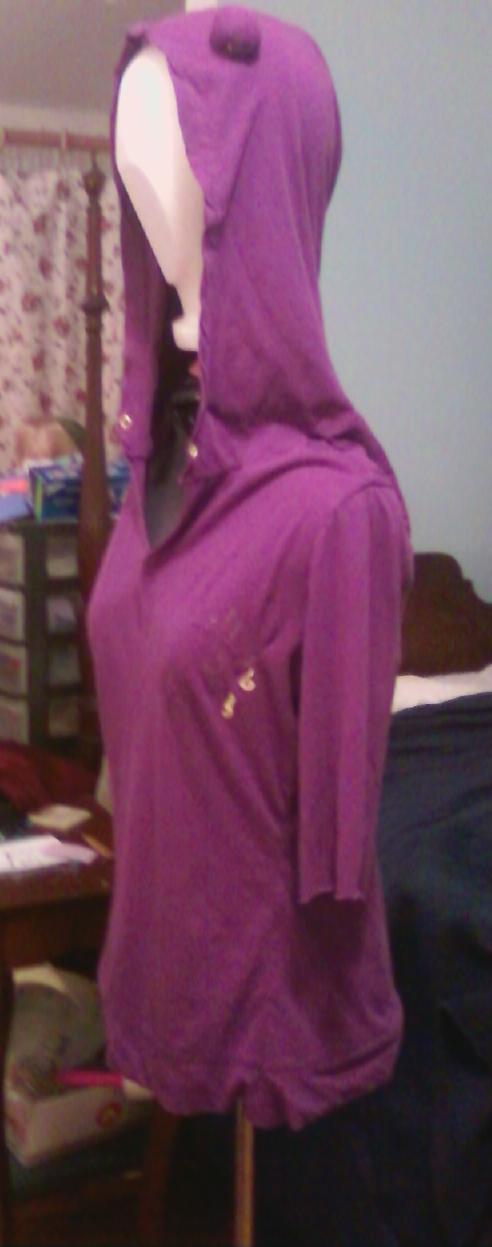 So progress on my Koffing cosplay has officially begun. I bought a shirt for it at the thrift store. It's the perfect color, one sleeve is shorter than the other (I am indifferent to this), it has a hood, and it had this ugly little seashell thing with seahorses painted on it sewn onto the front. It took me two days to stitch-rip the thing off, and I ended up taking chunks of the shirt with it. I still haven't decided what to do to cover that up, but I'm thinking just stitch it and then make small holes and stitches all over the shirt, make it look intentional. I also took in the sides of the shirt some, since it had no shape to it whatsoever.
It's a little bit big on me, which I love, it hangs well, and the fabric is super comfy. I decided to put the little bump things on the hood instead of making a hat and trying to match fabric and stuff, but I'm having trouble getting fabric pieces big enough to make the bumps. I tried using the extra from where I took the shirt in, but it wasn't big enough. I guess I'm going to cut the longer sleeve to match the other one and use the fabric from that.
Really, it doesn't look like I did anything to the shirt if you've never seen it before, but whatever. In the picture, I wanted to compare the size of the little bump thing to the rest of the shirt to see if it was big enough, so I balanced my wig head on top of my dress form. Earlier that day, I figured out that I could take the top off of my dress form and attach a wig head. That might creep me out though.
 I also finally started working on my boyfriend's Magikarp cosplay. It's going both faster and slower than I thought it would. On the one hand, when I get a chunk done, it's a huge chunk. On the other hand, details area pain. I cut out the two main parts of the tail and sewed the back together (needed a seam down the back for roundness) and attached the tail to it (a secondary reason for the seam). I added all of the scale outlines to the front piece (pictured left), and I started adding them to the back, but didn't finish.
The Magikarp wig has been sitting in the sewing room since February, but my boyfriend finally bought the yellow extensions that we needed for the front of it. They're just the cheap Hot Topic kind, but I'm hoping with some hair spray or something they'll be manageable. Usually when I wear that kind in my own hair, people can't tell if it's real or not, so as long as no one looks too closely, they're passable. My boyfriend looks like an Asian rock star in his wig, which is hilarious because he's Mexican but is always mistaken for being Asian. (I promised him I wouldn't post pictures online, but I'll be able to after the con.)
Fanime Planning (still...) (Days 571 - 579)
the dance performance that I mentioned in my last post is over, so hopefully I'll be able to work on cosplay more.
I decided that to cut costs even further for my Koffing cosplay, I'm going to use an old pair of jeans that already have a hole in the knee. I'll have to figure out a way to stop any holes from ripping further during wear too, but I guess that's later. I'm really looking forward to destroying a pair of jeans though. It sounds like it's going to be a lot of fun!
Here's a good tutorial that I found on distressing jeans, if anyone's interested.
 I'm not going to use all of the techniques in that video, I'm mostly looking at ripping holes, the thing with the sandpaper, and bleaching. I'm also not getting a wig for this, even though I found some really nice ones for $10. Instead, thanks to the brilliant mind of my friend FoxBerry, I'll be making a hat. I've already figured out how to do it, save for a detail or two, and I believe I already have the fabric. The real bonus here (other than saving money on a wig) is that once I figure out exactly how to make it, I can *gasp* sell them! Though none that I make will ever be as good as the first one, that's just how it is.
 I also found this picture of a Weezing gijinka that I was really attached to until I found the Koffing one. It's so adorable, and I had been thinking of a way to cosplay Weezing, though I'm not sure why, but it didn't stick in my head as well as the Koffing one did. In any case, it makes me want to have a little bomb prop. Though that's more time and money that I may not have. However if someone wanted to cosplay this when I cosplay Koffing, I might just love them forever. I'm just saying.
My boyfriend's and my panel, Magikarp: A History has gotten it's finalized time of 7:00pm on Sunday. You can RSVP on the facebook event here if you like, as well as get more details about the panel.
In addition to doing that, I applied to be a model for a "Mystery Designer" at Fanime. I don't know if I'll go through with it, since it'll take up Friday evening and Saturday morning and early afternoon, which would make me miss the Pokemon gathering, and I've had some pretty bad experiences with "random" designers, so we'll see what I think of this designer if/when I get chosen and meet them.
I decided that to cut costs even further for my Koffing cosplay, I'm going to use an old pair of jeans that already have a hole in the knee. I'll have to figure out a way to stop any holes from ripping further during wear too, but I guess that's later. I'm really looking forward to destroying a pair of jeans though. It sounds like it's going to be a lot of fun!
 I'm not going to use all of the techniques in that video, I'm mostly looking at ripping holes, the thing with the sandpaper, and bleaching. I'm also not getting a wig for this, even though I found some really nice ones for $10. Instead, thanks to the brilliant mind of my friend FoxBerry, I'll be making a hat. I've already figured out how to do it, save for a detail or two, and I believe I already have the fabric. The real bonus here (other than saving money on a wig) is that once I figure out exactly how to make it, I can *gasp* sell them! Though none that I make will ever be as good as the first one, that's just how it is.
 I also found this picture of a Weezing gijinka that I was really attached to until I found the Koffing one. It's so adorable, and I had been thinking of a way to cosplay Weezing, though I'm not sure why, but it didn't stick in my head as well as the Koffing one did. In any case, it makes me want to have a little bomb prop. Though that's more time and money that I may not have. However if someone wanted to cosplay this when I cosplay Koffing, I might just love them forever. I'm just saying.
My boyfriend's and my panel, Magikarp: A History has gotten it's finalized time of 7:00pm on Sunday. You can RSVP on the facebook event here if you like, as well as get more details about the panel.
In addition to doing that, I applied to be a model for a "Mystery Designer" at Fanime. I don't know if I'll go through with it, since it'll take up Friday evening and Saturday morning and early afternoon, which would make me miss the Pokemon gathering, and I've had some pretty bad experiences with "random" designers, so we'll see what I think of this designer if/when I get chosen and meet them.
Subscribe to:
Posts (Atom)