I hope everyone's Thanksgiving went well, and if it didn't, I hope you at least got some interesting stories out of it! I didn't participate in Black Friday shopping because there really wasn't anything that I was interested in fighting people for. I mean, there were good deals on stuff I liked, but not stuff I needed, and I still haven't figured out what I'm buying for anyone, so I couldn't shop for other people either.
On the cosplay front, I haven't been up to anything. In an ideal world, I'll organize my cosplay closet and get rid of some things soon, but we all know that's not going to happen. It's just that I'm running out of room for things in my sewing room.
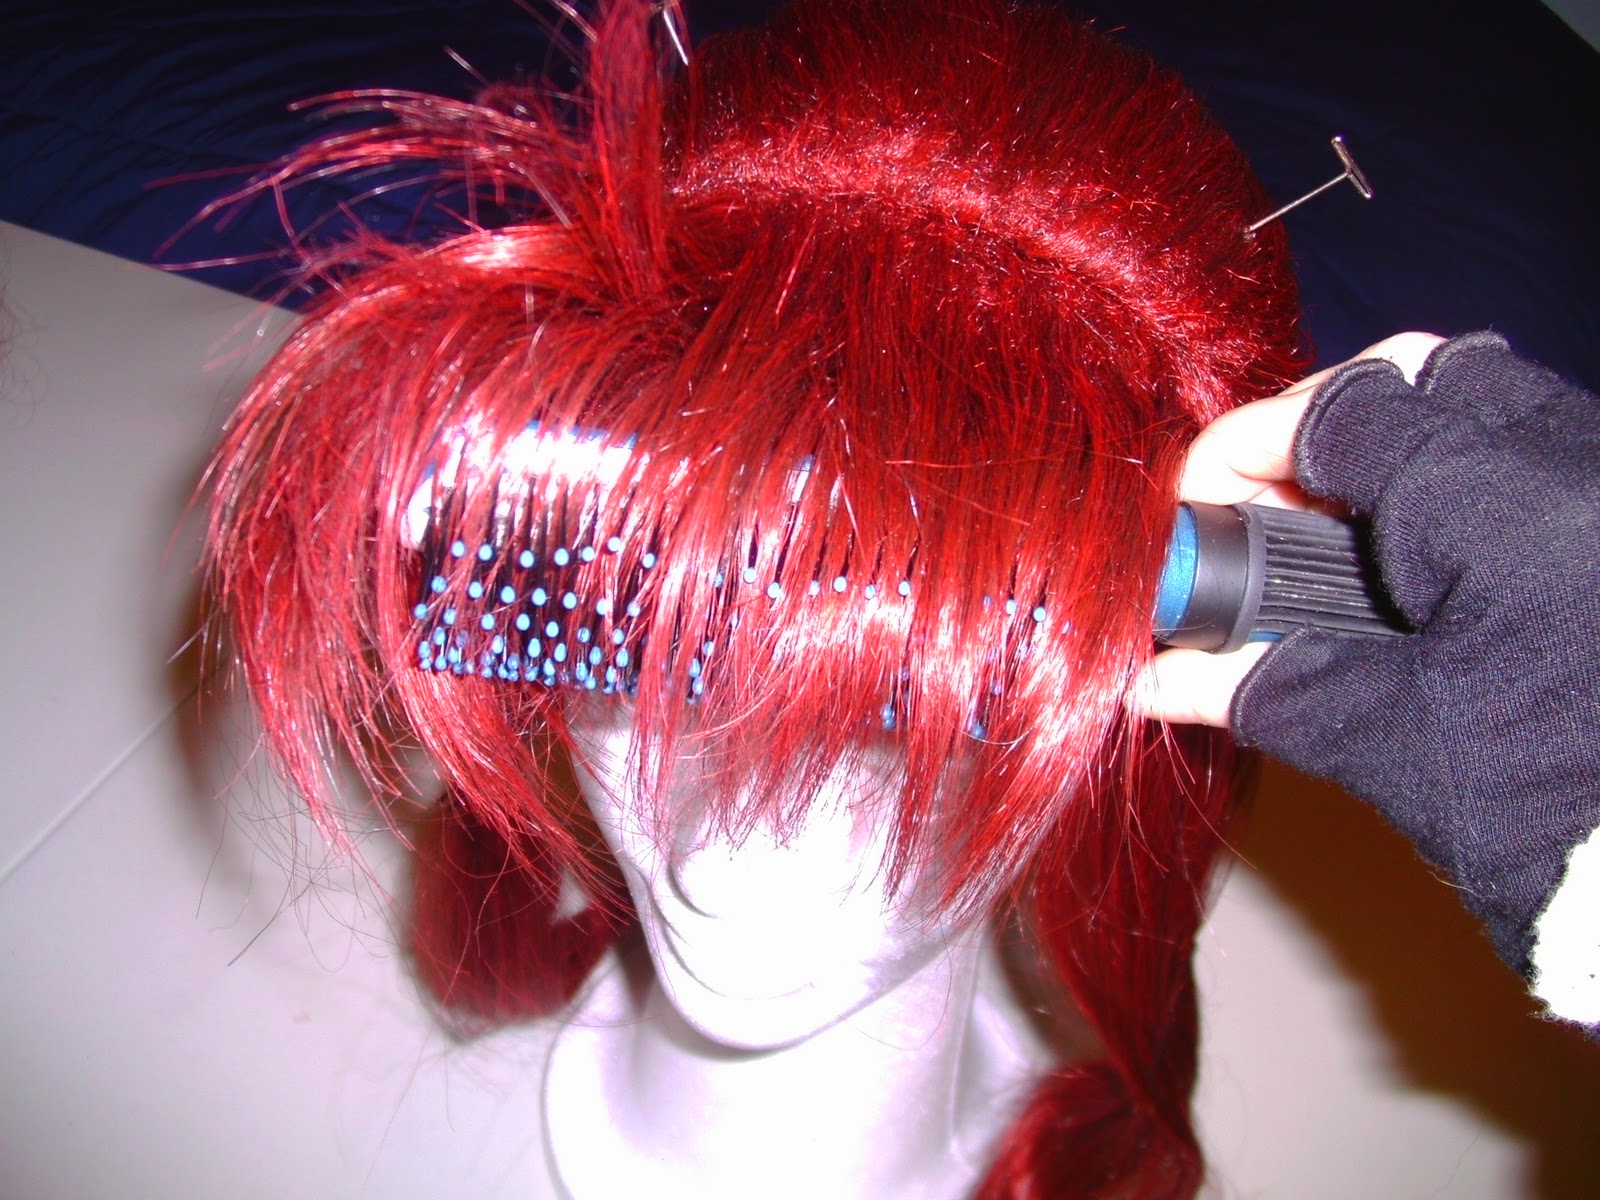
Yoko Wig Review
It took a while, but here's the review of the wig that I use for Yoko. I've never written a review like this before, and I have no format to go by, so I hope this turns out well.
Price, Customer Service, and Shipping
The wig cost $21.79, and shipping cost $12.95. Overall, the price was in the middle range of wigs available on Ebay and Amazon at the time. I didn't want to choose the cheapest, for fear of the wig quality reflecting the price, but I also didn't want to choose the most expensive because I just don't have that kind of money.
After ordering, I received a total of three automated e-mails regarding the wig. One to confirm purchase, one to confirm payment, and one automated thank-you e-mail. Since I had no issues with payment, and everything was confirmed immediately after, I had no reason to contact the seller.
I received my wig four days after I ordered it.
Quality and Condition
When the wig arrived, it was in two pieces, with the actual wig nicely wrapped in a net and bag, and the ponytail just in a bag. The wig was a little messy, but overall looked good. The ponytail on the other hand, was quite the mess. It was easily brushed out, but I wasn't happy with the condition it arrived in. I believe the ponytail should have been shipped in the netting and bag.
The wig is very thick and soft, and the color is gorgeous. It's not too bright or too dark, and it's definitely red, not any kind of off-red. It's made up of different-colored wig hairs, instead of all one color, some hairs are bright red, some are dark red, and some are even black. This gives it depth, highlights, and lowlights to the wig and makes it look more natural. As natural as a bright red wig can get anyway, haha.
Ease of Wear
The base of the wig was a little small, but after taking out the ponytail and re-tying it a little bit looser, the elastic inside had enough to give to make it fit. It has two adjustable strips of elastic on the inside to make it smaller as well. There are three toupee clips on the inside, two in the back, and one in the front to help hold it on.
The clip-on ponytail is so heavy. Even with the toupee clips and a bunch of bobby pins, I resorted to wearing the ponytail draped over my shoulder, because with it just hanging down my back, the wig slipped off way too fast. Even then, I had to re-adjust my wig multiple times throughout the weekend.
I believe with even more bobby pins and by braiding the front of my hair so that it has more to anchor to, I can re-distribute the weight evenly, and it won't slide back as much, if at all. Silicone spray should help with preventing tangles, I just haven't gotten any yet.
Durability
I wore the wig two days in a row to a convention. I had to brush it out often during the day, about once an hour, and had to brush it out again both nights and mornings. I think if I had worn the ponytail down my back instead of over my shoulder, it would have tangled considerably less. Also, the aforementioned silicone spray should help.
Styling
I don't have much experience at all with styling wigs, but what I needed to do for this wig was very simple. It was pretty easy to style once I had a plan and stuck to it. It took some time, but was easy. Here is what I did and my experience with it. I have no complaints about styling this wig, other than my own inexperience.
 |
| First day I got it, no styling. |
 |
| About mid-day at the convention |
 |
| Beginning to style for the second time |
 |
| After styling for the second time. (mirror image) |
 |
After styling for the second time
(side-view)
|
Fabric Folding (Days 654 & 655)

It took a few hours, but now everything, or at least almost everything, is neatly put away and a lot easier to find. At the end, there was a bunch of fabric that I left stuffed in the bottom of a box because I just couldn't be bothered with it.
I didn't really sort the fabric beyond fleece goes in one box, and everything else goes in other boxes. I tried to keep fabric from certain costumes together, for example, all of the leftover fabric from Franziska von Karma is piled together in a box, and all of the stuff I used or will use for Yoko is together. Beyond that, if I found multiple scraps of one kind of fabric, I piled them together, but I don't have enough boxes or room to keep everything separate. One container is entirely lace scraps that were all given to me.
I checked in on my Yoko wig, which I styled a couple of days ago. The styling held up pretty well, though the bangs could be even fluffier. That was a downfall of my styling, I think, I could have styled them fluffier to begin with. In any case, I believe my styling method would hold up for a day at a convention, seeing as it survived two days in the closet. I'll re-fluff the bangs anyway before I wear it again.

There are also several other versions of Yoko that I've got my eye on from the S.t.a.r.S. video, including bunny suit, plug suit, and cheerleader. It would also be really cool if I could convince the group O cosplay with to do the school uniform versions as a group, but haha, probably not going to happen.
Styling Yoko's Bangs (Day 653)
I randomly had the urge to try and re-style the bangs of my Yoko wig today. I'm not sure if you could call this a tutorial or what. It is what it is, but I hope it's helpful in some way.
The wig that I have is not heat-resistant, so using a straightener or curler to get the fluff and roundness into the bangs is out of the question. I used this method on another wig and it worked perfectly. It was slightly less perfect on this wig, but I still got a desirable effect.
 Tools:
wig
wig head
wig pins (to hold the wig onto the head, I used 5)
brush
comb (optional)
bobby pins
hair Spray (I recommend Suave with a hold of at least 7)
hair drier with "cold" setting (optional)
(In the photo, the loose hair on the sides is bobby pinned together just to keep it out of the way, and because I was doing other style earlier.)
Make sure the wig is securely pinned to the wig head. I used 5 pins, but I was also re-doing the ponytail earlier, so I needed extra. Two or even one would probably be fine, but I suggest at least 3 to be on the safe side; two on the top (one on each side) and one in the back at the bottom.
 Gather the bangs together, and bobby pin them back onto the top of the head. Make sure as much of the "roots" of the wig are showing as possible, and try to keep the bangs evenly spread out, don't squish them together in a tight bunch. I suggest pinning the middle of the bangs, but the bobby pin placement doesn't affect the end result, so put them wherever works best for you. I used two bobby pins to hold them in place, one from each side.
 Put hairspray on the bangs. Pay special attention to around the roots, and only spray lightly on the ends. Let this dry for about 15 minutes. If you would like, use a hair drier on the cold setting to make this go by faster.
 When you take the bobby pins out, the bangs should more or less stay where they are. If they don't, most likely, the hair spray hasn't dried yet, pin them back where they were.
 Brush the bangs forward. Be as gentle as you can, but they should take some persuading to move forward. Don't brush them downward.
 Put the brush on the underside of the bangs use it to pull the bangs forwards and slightly down with a twisting motion. The bangs should stay extra fluffy. If you pull them down too much, put the brush underneath and brush straight upward, they should go back to looking like the step above.
Repeat this step until no more hairs stick upward.
You can now lightly brush on top of the bangs to smooth them out. I suggest the comb for this step, as it lets you have more control.
 If the bangs are really thick and heavy, separate the top layer and pin it back on its own, and repeat the previous steps on just those layers.
When you're finished, spray a light layer of hairspray over the bangs and let it dry.
After this, I used the comb to create a side part in the bangs specifically for Yoko. While doing any additional styling with the bangs, every now and then, comb the bangs upward to be sure they keep their volume.
Here's my result:


(Note:The first picture was taken in the mirror, the part is actually on the left.) The volume and shape are much more visible from the side than the front. I'm happy with the styling as it looks quite natural and subtle, but it's nowhere near as flat as it was in the beginning picture.
I checked in on the wig after a couple of days, and the styling held up well. The bangs could still be fluffier, but that was a fault of my original styling, I don't think they deflated or anything. They seemed to have about the same amount of volume as they did right after I styled them. I believe this method of styling would hold up through a typical convention day.
The wig that I have is not heat-resistant, so using a straightener or curler to get the fluff and roundness into the bangs is out of the question. I used this method on another wig and it worked perfectly. It was slightly less perfect on this wig, but I still got a desirable effect.

wig
wig head
wig pins (to hold the wig onto the head, I used 5)
brush
comb (optional)
bobby pins
hair Spray (I recommend Suave with a hold of at least 7)
hair drier with "cold" setting (optional)
(In the photo, the loose hair on the sides is bobby pinned together just to keep it out of the way, and because I was doing other style earlier.)
Make sure the wig is securely pinned to the wig head. I used 5 pins, but I was also re-doing the ponytail earlier, so I needed extra. Two or even one would probably be fine, but I suggest at least 3 to be on the safe side; two on the top (one on each side) and one in the back at the bottom.


Repeat this step until no more hairs stick upward.
You can now lightly brush on top of the bangs to smooth them out. I suggest the comb for this step, as it lets you have more control.

When you're finished, spray a light layer of hairspray over the bangs and let it dry.
After this, I used the comb to create a side part in the bangs specifically for Yoko. While doing any additional styling with the bangs, every now and then, comb the bangs upward to be sure they keep their volume.
Here's my result:


(Note:The first picture was taken in the mirror, the part is actually on the left.) The volume and shape are much more visible from the side than the front. I'm happy with the styling as it looks quite natural and subtle, but it's nowhere near as flat as it was in the beginning picture.
I checked in on the wig after a couple of days, and the styling held up well. The bangs could still be fluffier, but that was a fault of my original styling, I don't think they deflated or anything. They seemed to have about the same amount of volume as they did right after I styled them. I believe this method of styling would hold up through a typical convention day.
Kin- Yoobi 2012 Venue (Days 650 - 652)
So I haven't done cosplay stuff for the last few days either. I was going to make a small wig styling tutorial today, but never got around to it.
 Although, I do have good news! Ki-Yoobi Con has confirmed its date and venue for 2012! This is a huge improvement on the timetable from previous years, when sometimes the venue wasn't officially confirmed until the day before or the morning of. In any case, Kin-Yoobi Con will be on Saturday & Sunday, August 11th & 12th, at the Hilton hotel in Newark, CA. When we went on a tour of the hotel before deciding we wanted to move there, I took a few photos of some areas that I thought might be nice for cosplay photoshoots. I don't really have much else to talk about, so here's some of those photos.


Days 648 & 649
So I really haven't done much of anything since the gathering, but I wanted to catch up on blogging. I finally put away my Galvantula wig after it sat wrapped up in a mesh bag for months since I last used it I saw it almost every day and just left it there. I feel bad, I thought it was ruined, but after a gentle brushing, it looks better than ever! I plan to use that wig for my Ironette cosplay, but it's not a very high-quality wig, so I may not. It just has very nice and appropriate styling for Ironette.
I cleaned up the sewing room some, but not a lot. I plan to work on cleaning it up a little bit every day until it's done. It's a really big task, could take a really long time. People just keep giving me things, and I keep buying things, so stuff just piled up. I really do love when my sewing area is clean and I know where everything is, it just gets so messy so easily when I'm working on a project!
I cleaned up the sewing room some, but not a lot. I plan to work on cleaning it up a little bit every day until it's done. It's a really big task, could take a really long time. People just keep giving me things, and I keep buying things, so stuff just piled up. I really do love when my sewing area is clean and I know where everything is, it just gets so messy so easily when I'm working on a project!
BAC @ Exploratorium (Day 647)
 I went to the Bay Area Conventions gathering at the Exploratorium in San Francisco with my boyfriend and two friends. The gathering started at 9:30am, but in our usual fashion, we slept in and didn't plan to leave until 9:30am. I had talked to the gathering organizer beforehand and let her know we were going to be late though. Also in our usual fashion, we didn't leave when we planned to. Luckily, it wasn't as late as the last time, and I believe we ended up leaving around 9:45am-10:00am. I went dressed as Christmas!Chi from Chobits/Tsubasa: Reservoir Chronicles.
I woke up at 8am and got out of bed around 8:30am. I purposely set my alarm for half an hour earlier than I wanted to get up so that I could lay around in bed for a while. I did my makeup, got dressed, made sure all of my stuff was ready to go, and ended up being ready to leave five minutes early. My boyfriend stopped by the gas station before coming to my house. He called me around 9:35am in an absolute panic because he was at the gas station and his car wouldn't start. We were just kinda stuck. I know nothing about cars, I don't own a car, neither of the friends we were going with currently has a car, I just had no idea what to do. Luckily, after what felt like forever of panicking, my boyfriend figured it out. He had put his car into drive before turning it all the way on, so the engine wouldn't turn over. He picked me up, we picked up our friends, and we were on our way.
The drive to San Francisco went as it usually does, though we took a different route than usual. We got a little bit turned around as we got closer to the Exploratorium, but it wasn't so bad, and we got straightened out in a few minutes. We parked behind the building in the parking lot, and then had to walk around the building. We couldn't decide which way to walk around the building, so we went to the right. After walking for a few minutes, we came across a sign that read "Entrance 200 feet" with an arrow pointing the the opposite direction. Whoops. We turned around and walked the other way.
We bought our tickets and went inside to look for other cosplayers. The event organizer didn't pick up her phone, but I spotted some familiar faces upstairs and went to say hi. It turned out that everyone was just kind of wandering on their own, so we followed suit. My boyfriend and I looked around upstairs, our friends went to find a bathroom.
My boyfriend and I played with the electrical and magnetic exhibits first. I enjoyed the magnets, especially the magnetic liquids that you could move around with magnet wands. My boyfriend managed to shock himself pretty bad with one of the exhibits because he didn't finish reading the exhibit placard before interacting with it. It was hilarious. I heard back from the event organizer who let me know that the group would be getting lunch and then meeting outside at 12:30pm.
Around 12pm, we went downstairs to buy lunch, as we had both forgotten and ran out of time to bring our own sandwiches. Lunch was expensive! One sandwich was $8! Luckily, one of our friends gave my boyfriend some of her pizza, which was rather large, so we only bought lunch for me, a soda, and an ice cream. Eating lunch was interesting, we mostly people-watched. Then we were told that the group was heading outside. We headed out, and my friend overheard a mother with her husband and two children say, "It's Christmas Chi!" We were all amused and I was pretty happy that someone outside of our gathering knew who I was.
Once outside, a bunch of people started dancing to Vocaloid music. Having next to zero interest in Vocaloids, my boyfriend and I quickly got bored and wandered off to look at ducks in the lake. I had just recently studied different types of birds for marine biology class, so I had a lot of fun pointing out different types of birds, including grebes, which look a lot like little black ducks.
 After some dancing, the group moved to the other side of the lake for a group photo and individual photoshoots. The group shot took a little while to organize with so many people there. We were supposed to be arranged by height, which always seems to take forever no matter who's doing it. The photographers took photos of us, which was a little difficult for me at least, with the way the sun was reflecting into my face, but it was manageable. The backdrop to the group photo was really beautiful, so the sun was definitely worth it.
 The group broke apart after the photo to do individual and smaller group photoshoots. One of my friends went to join the "90's" photoshoot, so my other friend and I decided to take photos on our own, with my boyfriend as the photographer. My friend suggested we take photos in/near a tree, which is funny because that's what I did the last time I had a 'shoot as Chi. I thought that my friend and I were going to take photos together, even though we weren't cosplaying from the same series (she was cosplaying from 'The World Ends With You'), but it didn't happen. Ah well. She kept making me laugh while my boyfriend and Blizzard Terrak were taking photos of me, which is a little frustrating, but it's really more fun than anything.
I really enjoy doing photoshoots in trees, most likely because I like climbing trees in general. Granted, climbing trees is a little harder while I'm wearing high heels, but still fun. My boyfriend actually had to lift me up into the tree for the photoshoot, and the branch I was sitting on was about six feet off of the ground. He had to pick me up by my legs, haha, it's a good thing I'm used to being picked up a lot.
 Our friend returned from the 90's shoot, and my boyfriend took pictures of my friends. After a couple of in-character photos, they just started being silly. We moved to a different location by the water to take more photos. The water was so pretty and photos with water always turn out really well for other people, so I was really drawn to it. I sat on the stone railing that went around the lake and dangled my feet over the edge. I didn't put my feet into the water, but I could see that it was surprisingly shallow. I could see the bottom of the lake through the murky water.
There was still a lot of time left before we were to meet back up and go inside the Exploratorium again, so we walked around the lake to a new photoshoot location. A lot of people followed our lead, I was surprised, I thought anyone that wanted to move had already moved. Across the lake, there was, I'm not even sure what to call it, but really beautiful structures. My boyfriend and I mostly wandered, looking for graffiti for one of my friends to pose by, sort of in-character. We saw the same mother from earlier. Her son looked at me and said, "I don't know who that is," to which the mother replied, "That's Chi!" I just smiled really big at them. I don't really know what response they expected, if anything, haha. They may have thought I was weird, but they made me really happy.
 We wandered more, and some people, not sure who, found this adorable fuzzy black and yellow caterpillar. That little guy could move, he was so fast! Usually, I'm kind of afraid to hold bugs, I don't like the way their little feet feel on my skin, but I was wearing gloves, so I had to hold the little guy. I asked my boyfriend to take some pictures of me with it, since Chi looking at a tiny caterpillar sounds cute, but you can't really see the caterpillar well, since he's mostly black and my gloves are black.
 I had a short photoshoot with my friend Foxberry (Weise Studios) before going back to the Exploratorium. On the way back in, my boyfriend and I stopped at a couple of fun exhibits, including a drinking fountain that looks like a toilet. My boyfriend got a kick out of it, but there was no way I was drinking out of that thing, it grossed me out. I find it interesting because the exhibit was actually about how it would gross some people out, but other people would be fine with it. We also stopped to take pictures on differently-sized chairs. I liked the giant chair, it was fun.
We then went to the part of the Exploratorium that had to do with lights and eyesight. It was really a trip, I absolutely adore optical illusions. There were things like
 switching face parts with a friend or blending faces together. I really enjoyed the sepia-toned room. There were special lights in the room that made everything in it turn brown. The picture to the left was taken with my camera on the normal point-and-shoot setting with no filters and no editing afterward. There were flashlights hanging from the ceiling with regular, LED lights in them that you could point at things to see their real color. It was mind-blowing. I would not mind having a sepia-toned room in my house. I wonder how long it would take for the novelty to wear off.
My boyfriend and I met up with Foxberry and her boyfriend and palled around a little bit before heading to the gift shop with everyone else. The books they had were bother interesting and funny, with titles like "When Is a Planet Not a Planet? The Pluto Story", "Poop", and "Sic Cumfrence and the First Round Table". They also had a really neat shower curtain of the Periodic Table of Elements, like the one seen in the show "The Big Bang Theory". I really wanted it, but I didn't want it to the tune of $35.
 On the other side of the store, there were toys and fun things more for kids. I went looking for the "Astronaut Ice Cream", but didn't want that to the tune of $4, I'm a cheapskate, so I looked around more. Foxberry pointed out that they had giant microbe plushies of things like mono and such. I've seen them online, but never in person. I then found two stand alone shelves full of small microbe plushies. I dug through all of them to find all of the different types. There was mono, the common cold, the plague, swine flu, e coli, and a bunch of others. My friend Julia asked for someone to hold up the sperm and egg plushies because she got a kick out of them and so that she could take a picture. I decided to get the common cold plushie, since it was really cute.
The cashier was really funny, he seemed really amazed at all of the people in costume. Turns out he had an interest in cosplay, but didn't know it was a thing. I wish I had talked to him more about it. He said, "If I were to dress up in costume, I think I would take it in a little different direction than ya'll. I would dress up like a Mortal Combat character." I told him, "I have friends that are Mortal Combat characters!" He took me a little too seriously at first, but hopefully he understood what I meant in the end. I was really in a hurry to leave, and the store was crowded, so I didn't want to take up anyone's time.
By this time, it was around 4:30pm, maybe, we had originally wanted to leave at 4pm, because the weather is really unpredictable, and we didn't want to drive home in the dark and the rain. We stayed later because we were having so much fun, ad we had arrived late, but we still didn't want to stay too late and run into bad traffic/weather. Getting out of San Francisco was really difficult for some reason, our directions were maddening and didn't make any sense. We ended up driving up some really steep hills, and it was really scary. My boyfriend was the one driving, we were in his car, and his car is very tiny and doesn't have a lot of power to it, so there were a few times that we were scared we were going to roll back down a hill.
Luckily, things were easier once we got onto the freeway, a lot easier than they normally are. The drive from there was pretty uneventful, we discussed things that happened that day, as we had a split up and done different things. There was some talk about future cosplays and future conventions.
Done Before Midnight! (Day 646)
 Today was pretty much exhausting. First I fixed Christmas Chi's ears. I'm surprisingly happy with the way they turned out too! That was pretty much the only easy part of today.
I then planned out how much fake fur I was going to need. I decided on a width of 11/2 inches, and measured around the bottom of the skirt, the bottom of the capelet, and the neck of the capelet. At this point, I also thought I was going to be making a hat, so I factored that in, but later scrapped it. I figured out that I didn't have enough fur to cover all of this, so I pulled apart one of Amaterasu's legs. Unfortunately, the leg fur was different than the fur on the shorts was, but I don't think it's too noticeable.
I made a quick Santa hat and then began adding fur to it. However, the fur didn't really behave the way I expected it to, and instead of wasting potentially hours working on something that probably wouldn't work anyway, I set it aside. I tried to figure out a way that I could use all of the same type of fur on everything, but it didn't work, so I decided on the thicker, heavier fur for around the neck, so that it wouldn't weigh down the skirt or mess with the shape of the capelet.
I cut the fur into strips and pinned them to the bottom of the skirt, a feat in and of itself, then began sewing. Originally, I wanted to use a zig-zag stitch, my favorite stitch, because I don't like the edges of fabric sticking up. My machine had a different idea though, and instead decided to try to eat the fur. It also only stitched half of the zig-zag stitches, which just gave me a straight stitch with a ton of tangled string underneath. I tried several times, but I couldn't get the zig-zag to work, even though it worked perfectly on scrap fabric, so I gave up and used a straight stitch.
 After that, it sewed almost perfectly, with only one or two hiccups along the way, mostly at the beginning. That is, until the end. I've been wearing fingerless gloves almost 24/7 because I get cold extremely easily, but I dislike regular gloves because they don't let me use my fingers. In the last three or so stitches, somehow the edge of my glove got pulled under the sewing machine foot, and I sewed two stitches through it. This is the closest I've ever been to running my finger over with the sewing machine, and I hope it's the closest I'll ever get.
I cut myself loose, finished the last few stitches, and moved on to the capelet. I put the trim on the bottom of the capelet first, and that went pretty well. I decided that I was going to line the inside of the neck piece though, since the underside of the fur is very scratchy. I took the cheap way out of all of this though. First, I used the fur that I had originally wanted to use for the hat, even though it was 2 inches wide instead of 11/2 like the rest. The top of it was hemmed down so that you couldn't see the edge of the fabric above the fur, and I needed a longer piece, so I hemmed anther piece. I wanted the pieces to be of equal length so that the seam would be in the back, so I cut both of them, turns out you can't see the seam at all anyway, so that was pretty much a waste. I cut a 2-inch wide piece of white velvet left over from Amaterasu to fit around the neck of the capelet. I sewed it on so that one inch overlapped the neckline, and one inch stuck up above it. Then I just hot-glued the fur onto the white velvet. Really cheap, but my machine was not going to have any more of that fur.
My boyfriend and I spent some time scouring my house for the black gloves that I used for Franziska von Karma, but we couldn't find them. We looked for my Santa hat too, which we also couldn't find. I had to run off to a GZR meeting after that, during which, I sewed a gold bell onto my black bowtie for this (hard to see in the picture).
When I got back, I hurriedly cut a couple of small pieces of the fur (to be used later) and cleaned up the sewing room because my grandma is staying with us and sleeping in that room. I also wasted a few minutes styling the bangs of my wig. While the styling actually turned out way better than I thought it would, I later realized that the bangs were going to be squished under a hat anyway. Then I suddenly realized that my Santa hat was most likely in the shed with the rest of our Christmas stuff. I took a flashlight and began digging through the shed. The first box that I could get to was all wrapping paper, so I set it aside, the second box was our (fake) Christmas tree, I set it aside too. Then began the actual digging. I moved and looked through nine large, heavy plastic bins and found nothing. Well, I found some weird knitted red and green hats, but not my Santa hat.
As I started to put things back, I figured I'd look in all of the boxes again, just to be sure I hadn't missed it, because I knew I packed it up last year after Christmas. It wasn't in any of the nine bins, so desperate, I thought, Well, it wouldn't hurt to look in the box with the tree... I opened the box, moved over the tree skirt, and there was my hat. It was in the second box I had my hands on the whole time, and I wasted all of that energy. I wrestled the last two boxes back into place and went inside.
I started to put on all of my completed pieces, but then I had a strong urge to look one last time for my black gloves. I opened up my closet and looked at the plastic drawers I keep some of my cosplay stuff in. I had already checked the drawer where I keep my gloves, but in the drawer above it, I could see my Lady Mario gloves through the plastic. Yup. The black gloves were in there too.
Feeling very pleased with myself, I put on all of the parts of my costume that I had: Two pairs of tights, skirt, belt, petticoat, shorts, tank top, long-sleeve shirt, capelet, wig, ears, hat, gloves, and shoes. Franziska's gloves are just past wrist-length, while the ones I have go to about my mid-forearm, and luckily, I never got around to hemming them, they've just been safety-pinned this entire time. I decided that I liked them better longer with this outfit. I also toyed around with the idea of wearing black fingerless gloves with white lace over my black gloves, but it just didn't look right. After taking a picture, I took off the hat, ears, wig, and capelet to finish styling the wig.
 In the reference picture I'm using, Chi has little white puff balls instead of her usual hair spools, which is extremely lucky for me, since I seem to have lost my hair spools. I thought it would look better if I had which puffs with red ribbon around the middle, but it actually looked really horrible, so I stuck with the white puffs by themselves. I'm quite pleased with them. They're glued onto tiny rubber bands, and hopefully they stay there.
I finished changing into my pajamas and began packing a small bag for the gathering. I decided on a small iridescent red/black bag (it's actually a makeup bag, but looks like a purse). I packed a few things, my mini first-aid kit, my camera, which I always freaking forget, and my wallet. I threw a few beauty products in there too, like some lotion and bobby pins. I then suddenly had the urge to organize my makeup some.
 My makeup is usually kept in three makeup boxes and all over my bathroom counter, and it's been a mess since before Halloween. I more or less put things back where they should be, though not in a very organized way, and then laid out the makeup that I use when I cosplay. I realized, wow, I put a lot of makeup on when I cosplay. I don't think it really looks like that much though, not unless I intend it to anyway. I don't wear nearly this much on a daily basis though. For everyday wear, I only use eyeliner, under-eye concealer, and occasionally acne concealer if I've got a really bad pimple or two. Also, I think about half of that is brushes, maybe a little less than half. Some day soon, I'm going to do a video about how I do my makeup for cosplay.
So tomorrow, I'm off to the Bay Area Conventions gathering at the Exploratorium!
Progress (Day 645)
 I made a considerable amount of progress on Christmas Chi today. First, I finished turning the top into a shawl. I'm extremely happy with the way it turned out. As mentioned before, this outfit was originally a children's dress, which I stitch-ripped into two pieces. For the top, I removed the arms and opened the sides, leaving only the shoulders connected. I re-sewed the shoulders back on and then sewed the sleeves down the sides. I had to round out the odd-looking corners that connected the shoulders to the sides. Then I roll-hemmed the sleeves to make them even with the rest of it. I also turned the shawl around backwards so that the button and the seam are in the front. I'd prefer the seam to not be there, it'd look better as a zipper, but there is no way I'm putting in a zipper in one day.
 On the skirt, I hemmed the top, which got rid of one of the lace parts. It wasn't entirely intentional, I like the lace parts, but I really needed to hem the top, it was coming apart from where I had trouble stitch-ripping it. I also added belt loops to keep the belt in place. The loops create an awkward pulling on the skirt, but I think that's just what belt loops do. The loops were made with leftover velvet from an old project (Mello from "Death Note") that is luckily almost the exact same color and texture as the costume fabric! It also reminded me that I can use that jacket when I wear Christmas Chi.
 After that, I quite literally ripped apart the shorts that I used for my Amaterasu (Okami) costume. I needed white fake fur, I didn't want to buy any more, and I want to remake Amaterasu anyway. Underneath all of that fake fur was a pair of jean shorts, by the way. They would be a nice pair of shorts if they weren't covered in hot glue remains. Does anyone know how to cleanly remove hot glue from jeans? It's really stuck on there.
 The white fur was mostly intended to be for the trim on the skirt and shawl, but I also used it to make a pair of fuzzy Chi ears! I really love one of them, though you can't see the pink on either, but the other came out kind of odd-shaped. I'm going to work on fixing it before the gathering, but I'm not really sure what to do, apart from taking the whole thing apart, which sounds less than fun.
They don't completely cover my ears (the backs of my ears stick out), but I think the combination of the wig, hat, and these will keep me sufficiently warm. The headband piece is a little big on my head, but fits pretty well with the wig on. Pardon my horrible face(s), these were taken at about 2am.
 I also have a few other ideas for staying warm in this costume. I'm going to wear two pairs of tights and two shirts, one elbow-length, one tank-top. Also as I mentioned earlier, I'm going to bring along my (very innacurate) Mello coat for even more extra warmth. I'll also be wearing gloves, though mine will either be black or white, as I don't own red gloves, don't want to look for or spend money on them, and don't have time to make them. I'd like to make the fuzzy cuffs seen in the reference picture, but I don't know how much time or materials I'll have for that.
I also played with makeup some today, trying to get the "big anime eye" look without looking too unnatural. Of course, by the time these pictures were taken, it had all but completely smudged off. I'm pretty sure I succeeded in what I was attempting to do, and I'm going to be making a video tutorial for what I did once I start doing vlogging (some time this month). Again, don't take these pictures as an example of my makeup experience, it was 2am, and it was a long day. Tomorrow, I try to fix the ears, add the trim to the shawl and skirt, and style the wig.
Christmas Chi! (Days 237 - 644)
 Hecka last-minute, but I finally figured out that I was for sure going to the BAC's Exploratorium gathering this Saturday, and I chose to cosplay a Christmas version of Chi from Chobits. I decided this less than a week from the gathering. Not including the wig, this cosplay has a budget of $5, and it's actually working out very nicely! So far, I've spent about $3.
There is an official Christmas version of Chi, I believe it's in the artbook, though it may be on the cover of one of the mangas, I can't remember. I'm deviating from the design quite a bit though, mostly because this is so last-minute. I'm trying to stay as close as possible, but some of it is just not happening.
First, the shawl piece is differently shaped. To make this entire outfit, I bought a children's dress from the thrift store, so there is very little that I can actually do. However, it's still a shawl, just not as perfect. I'm also wearing a shirt under the shawl, even though it doesn't appear that Chi is wearing one, because, yeah, I'm not leaving the house shirtless, plus, it's cold. I chose a black elbow-length shirt, mostly for warmth, but also to bring together a few of the black elements of the outfit.
Next, I'm wearing white tights instead of red. Solid-colored tights in any color but nude, black, or white are really difficult to find, and usually end up costing about $12 when I finally do find them, so I plan to go with the white ones that I already have. (Though I may try on black tights with it and decide I like those better.)
Also, I haven't decided on what to do about the shoes yet. I have black boots (which I will not under any circumstances be covering before Saturday), but my choices of black boots are either combat boots or knee-high boots, neither of which I think will work with this outfit. Most likely, I'll be wearing the shoes that I wore with my other Chi outfit.
Finally, and I think most noticeably, I'll be making furry ears instead of robotic ears, as seen on Chi in Tsubasa. I'm not happy with the two pairs of robotic ears that I own (I lost the cables to the open ones anyway), and I don't have enough time to mess around with craft foam until I find something that works. I have more experience working with fur and fabric, so that's what I'm going with. As a bonus, I'm making the ears into earmuffs so I'll be nice and warm!
 Here's what I've done so far. I took the dress apart into two pieces, and this is the skirt piece. I need to put a black belt around the top somehow,and I might just glue it for the time being, haha. I still need to finish altering the top into a shawl and then adding fake fur on both of the pieces. I'm gong to be taking apart. pieces of my old Amaterasu costume for fur, since I'm going to remake that costume eventually. I'm using a very small petticoat because without it, the skirt has absolutely no shape, but with a large (better) petticoat, the skirt takes on a very odd shape. (Side-note: The lace detailing on the skirt was already a part of it when I bought it, but I do not intend to take it off as that would make the skirt a good two inches shorter. Also, it's cute.)
JoAnn's Etiquette
I was going to post this with my last post, the story of the horrible trip to JoAnn's, but the story ended up really long, so I decided to make a second post for this. Also, the story post was very rage-filled, and I needed to calm down to make sense out of this post.
I'd like to start off by saying that these might not apply to every fabric store, or even every JoAnn's, but here's how things usually go at the JoAnn's I regularly visit.
Before going to the cutting counter
1. Figure out what fabrics you need. It's best to do this before you leave home, especially if you already have the pattern that you're going to be using. If you can't do this at home, do it before going to the cutting counter when no one else is waiting on you to finish.
2. Try to figure out how much fabric you need. Sometimes you can also do this at home. The first thing to know is that fabric as usually sold in yards, not inches, the smallest amount being one eighth of a yard. Now, I'm a very visual person, so I can't always decide exactly how much I need until I get to the cutting counter. To cut down on time, try to at least get a range of how much you might need. Since I often need small pieces, I sometimes have difficulty deciding between 1/8 of a yard and 1/4 of a yard, or between 1/4 of a yard and 1/2 of a yard.
Most patterns will tell you how much fabric you'll need on the back of the packaging. If you can't make heads or tails of the chart (it's confusing), then bring it to JoAnn's and ask an employee on the floor to help you out. Try to avoid asking employees at the cutting counter, unless no one else can help you, which does sometimes happen.
Just narrow down the amount you'll need so that you won't be thinking "somewhere between one and eighth yards" because that will get you nowhere. If you're in somewhat of a hurry and only know how much you want of some fabrics, go to the cutting counter and get those fabrics cut first. While the employee is cutting, slow down and decide how much you need of the other fabric. Try to keep it quick though, especially if there's a line. In my experience, if you think you might need more, you probably do.
3. Take a number. Even if there is a line already formed, take a number from the dispenser on the cutting counter. This is the only thing that will guarantee your place in line. Occasionally, if there are quite literally absolutely no other customers around, the employee at the cutting counter will tell you to come directly up. Otherwise, take a number.
In line
1. Don't complain. This is probably more of a pet-peeve of mine than etiquette, but it really grinds my gears when customers in line complain that the employees are taking too long with other people. Yes, sometimes the employees mess up or take too long or are busy chatting, but from what I've seen, most of the time, it's not their fault. Sometimes customers are indecisive or chatty, or really, really picky about how they want their fabric cut. From what I've seen, the employees want the line to keep moving just as much as you do, so please don't complain about them, they're only doing their job.
At the cutting counter
1. Be quick, but clear. Be as fast as you can, but make sure the employee understands how much of each fabric you want. Hand the fabric directly to them, touch the fabric, or specify by color/type and tell them how many yards you want. Pointing at the fabric that you want cut can slow things down because the employee has to the determine which fabric you're pointing to. I find that putting all of the fabric on the counter to the side of the cutting area, and then picking one up and handing it to the employee while telling them how much I want is the quickest, most effective way to communicate what I want. It's not that I think the employee isn't smart or can't figure out what I mean, I'm sure they're very smart and could most likely understand what I meant if I pointed, I just don't want to waste time with miscommunications.
2. Don't leave! This is what ticks me off the most. Don't leave the cutting counter while your fabric is being cut! Once the employee is done cutting one fabric, they need to know how much you need of the next fabric! Or then need to tell you the price or give you your receipt, or whatever! Just stay there until you get your receipt.
3. Be friendly, but move along. It's okay to chat with the employee while your fabric is being cut. They'll often ask what you're making, especially if you're a frequent customer. But once your fabric is cut, please politely wrap up your conversation and leave so that the next person can get their fabric cut.
I feel like my thoughts may not have come out very clear in this post, I ended up writing this very late at night, so if something seems off, doesn't make sense, or comes off really rude, please tell me. I realize some things may come off a little rude, and that may just be the way I feel about those particular things, but I always try to be careful with my phrasing, and this was a sort of rage-fueled post, so if it seems really rude, please let me know so that I can at least change phrasing.
Again I'd like to mention that this is the way things generally go at the JoAnn's that I frequent. It may not be the same at all fabric stores or even all JoAnn's stores. Also, if you're new to fabric shopping and have done some of the things that I recommend against, don't sweat it too much, just don't do it again. If I thought everyone in the world knew what they were doing, I wouldn't have made this post, which is one of the reasons that I don't want it to sound really rude.
Ridiculous JoAnn's Trip
 I had a pretty miserable time during my most recent trip to JoAnn's, mainly due to people not really knowing what they're doing.
I went to JoAnn's for a quarter yard of brown fleece to finish a hat that someone requested. I selected my fabric, pulled the very full bolt off of the shelf, and grabbed a number from the cutting counter. At the time, there was one employee cutting fabric, and only two people in front of me, one woman in line, and one woman getting her fabric cut. She had three bolts of fabric, so I was hopeful that this would go quickly.
The customer in front of me was chatting with the employee cutting her fabric, which is cool, she was just being friendly, but since she was taking up time, the employee called for another person to help cut fabric. Cool, now things should go even faster.
The first customer was talking about what she was making, and said something along the lines of, "But I don't know what to use for the edge. You only have dark blue..." then she wandered away from the cutting counter to go look at fabric again. Alright, if she were just going to grab a fabric you forgot, fine, but she just went back to browse.
I directed my attention to the other customer at the cutting counter, hoping she'd be going faster. She also had three bolts of fabric, so I was hopeful. Then she handed the employee cutting her fabric this mass of pink sheer fabric and said, "I want this, but I don't know how much it cost." The employee asked her, "Was there a piece of cardboard on the shelf?" The customer says that there wasn't. The employee suggests, "Oh, I'll come help you find it," and walks around the counter toward the fabric. By this point, I already knew she was going to take forever.
Meanwhile, the other lady is still browsing fabric. She calls from one of the aisles, "Oh! I like this white fabric!" The employee says, "Oh, that looks good! Wait, what about that bright green one there?" She looks at another fabric the customer brought to the counter, "You've got some green in this other fabric here!" The customer in the aisle says, "Oh, yeah! That could work!"
The employee searching for a fabric price is wandering, the customer telling her, "It was in the next aisle over!" Turned out it wasn't in an aisle, it was on a display stand (the kind they use to push sale/seasonal fabrics). The employee searches for all of five seconds, pulls out the cardboard that the pink fabric was supposed to go on, and brings it back to the cutting counter. She tells the customer, "This fabric is $9.99 a yard, and so are these other fabrics," picking up two other bolts of fabric that the customer wanted. The customer decides that she doesn't want those three bolts of fabric, and offers to put them back on the shelves. While this was a nice gesture, I'm sure she just wanted to save the employee the trouble, it would have cost so much more time. Luckily, the employee at the cutting counter took the fabric from her and put it in the racks behind the cutting counter.
Back at the other end of the cutting counter, the customer asks for three inches of her chosen (white) fabric. She then offers to put back some other bolt of fabric that she didn't want. As the customer left, the employee called in on her walkie-talkie to ask if she could even sell three inches of fabric, usually they sell by the yard, smaller amount are sold as half-yard, quarter-yard, etc. Apparently, she got the go-ahead, because she started cutting the fabric.
The other customer's daughter walked up to the counter with another bolt of fabric, and the two marveled over how pretty it was. The daughter disappeared back into the rows of fabric. Some time during all of this, another woman had come up behind me to wait in line. I don't know if she took a number or not, but I wasn't really concerned.
The customer who had gone to put a bolt of fabric away had gotten distracted by the bias tape and was happily chatting away with another woman who had been browsing bias tape. The employee cutting her fabric had finished cutting the three inches of her white fabric, and began laying out the customer's third bolt of fabric. At this point, I think the employee was just killing time until the customer came back. She laid out the fabric, straightened it, and cut off the uneven edge.
The other customer had disappeared, and her daughter had taken her place with a bolt of sheer orange fabric. The employee was laying it out and measuring it. When she got to the end of the bolt, she told the daughter that there was nine yards. The daughter then shouts this to her mother, who was returning from somewhere, and the mother says something along the lines of, "Oh, okay, we'll get six yards." The daughter relays this to the employee for clarity, as her mom was kind of far away when she said this, and the employee starts to re-roll the fabric onto the bolt. I don't understand why she couldn't have cut the fabric first and rolled the extra later to save time, I've seen other employees do this, but okay.
The first customer returns from the bias tape and tells the employee that she wants two yards of the last type of fabric. She then leaves again! I hear the woman behind me sigh, and I turn around to see her facial expression and get her opinion on these goings-on. She rolls her eyes, struggles with her two or three bolts of fabric, and says, "These people are taking forever." I turned back around and tried to convince myself she was referring to the customers, not the poor employees, who were I'm sure doing the best they could.
Another employee was called over, as obviously all of this was taking too long. She picked up the intercom microphone and called "Now serving guest number 32." She looked expectantly at me, and I disappointingly told her, "I have number 33." She shrugs and says, "I'll help you anyway." Seriously, all I needed was a quarter yard of brown fleece. It took maybe twenty seconds to lay out the fabric, cut it, and print out my receipt.
Halloween (Days 633 - 636)
Halloween felt very rushed, but I still had a lot of fun. I pretty much just did makeup and then played laser tag. Makeup took a lot longer than I thought it would, and laser tag only lasted fifteen minutes. Then I went home and watched TV.
Pictures coming soon!
Pictures coming soon!
Subscribe to:
Comments (Atom)